 Cameron MacLeod
Build a snake game on the BBC micro:bit
A detailed tutorial (simulator included)
Mon 18 May 2020 Tutorials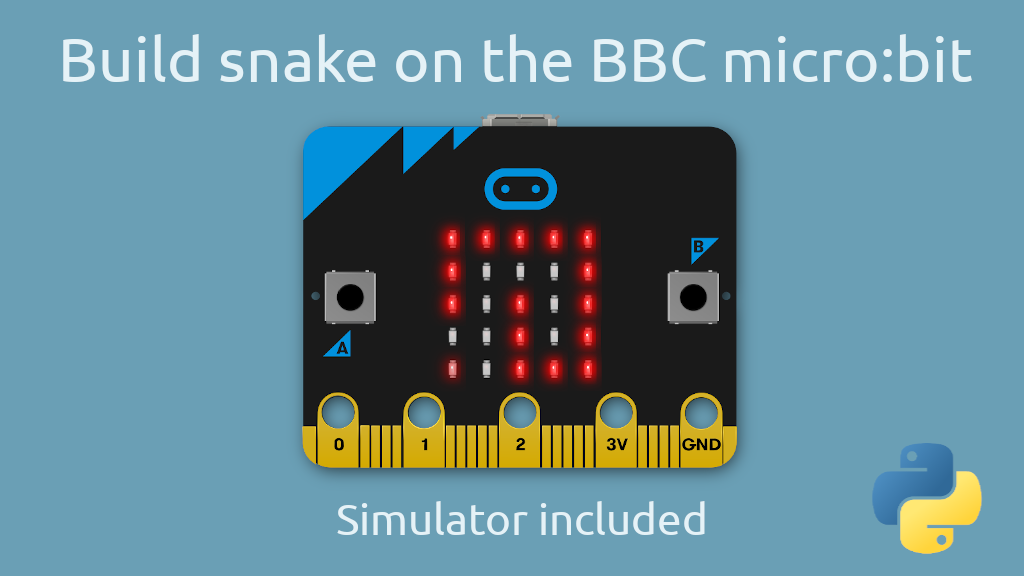
By the end of this tutorial, you'll have built your very own game and learned not only about game development, but Python and the BBC micro:bit too. What's more, you don't even need to own a micro:bit to follow along!
Below is a preview of what we'll be building.
Pre-requisites#
This tutorial will assume that you know what Python is, and that you know some basic programming concepts. But don't worry, if you consider yourself a beginner then this tutorial is for you. In fact, I will try to over-explain things and provide solutions to every exercise, so there's nothing to fear!
With that out the way, let's get started.
Quick links
What is a micro:bit?#
A micro:bit is a tiny computer that you can program in Python. It comes with an LED grid (for a screen), an accelerometer (to detect motion), electrical outputs (for controlling motors, lights etc) and a bunch of other cool features. They're also pretty cheap (£20/$20 at time of writing on Amazon), and programming them is as simple as dragging a file to a USB stick.

If you don't already have one, don't worry! There are simulators available online and you'll be able to follow along with this whole tutorial.
Setting up environment#
Whether you have a micro:bit or not, the first step is to open the create.withcode editor. When you do, you should see a screen like the one below.
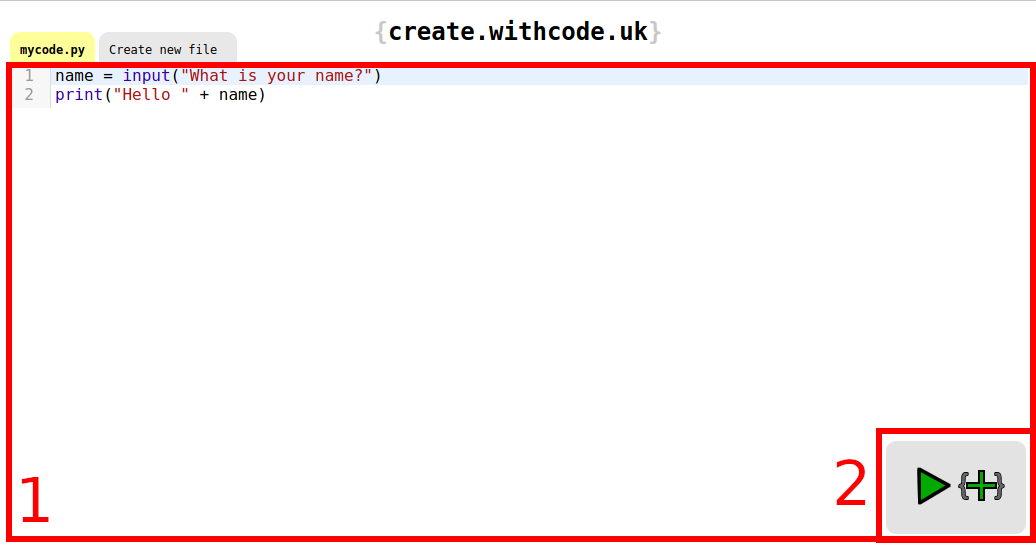
Most of the screen (1) is taken up with the editor. This is where you'll put your code. In the lower-right corner (2) is a button to run your code which looks like a green triangle. Alternatively, you can run your code by pressing Ctrl+Enter.
Your editor will auto-backup your code to your computer. You can access these backups by clicking the "+" button in the lower-right corner then clicking the button that looks like a clock.
Running your code will produce a pop-up that looks like the below.
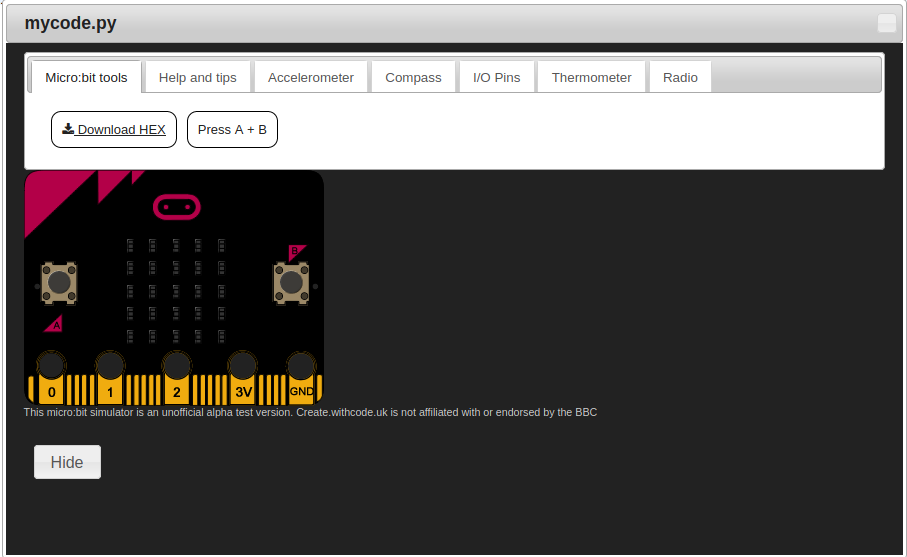
Your code will be running on the virtual micro:bit you can see, and there are tabs along the top for your to control various inputs to the device, which will become important later.
If you are working with a physical micro:bit, then the "Download HEX" button in the top-left of the pop-up will allow you to download the file you need to program your micro:bit. You can drag this file to the "MICROBIT" device in your file manager to program it.
Before we start looking at some code, let's take a quick detour to look at the game of Snake.
Snake#
Fun fact - if you go to Google and search for "snake", a snake game should appear. Just in case it doesn't appear for you, you can play it here. Below you can see it in action.
This is a good example of a snake game. It has all the necessary components:
- A grid on which the snake moves.
- The grid has cells, which can be identified by their X and Y co-ordinates.
- A snake.
- The snake occupies some cells of the grid (you can think of it as a list of co-ordinates).
- The snake has a direction (up, down, left, right).
- Some randomly generated food on a cell.
- An end condition.
- In the video this happens when the snake crashes into itself, losing the game.
So in theory, if we can build all these components, then we should have a snake game!
Skeleton code#
To make it easier to get started, we'll be working from a skeleton file. Find it at this link and copy the contents into the create.withcode editor.
Let's take a look at each part of the code to figure out what it does.
from microbit import *

class Snake:
...
At the very top of the file is an import. An import allows us to use code someone else has written in our own script. In this case, the other code we're using is the microbit library, which allows us to control various components of the micro:bit including the display and accelerometer.
Skipping the class definition for now, at the bottom of the file is our game loop.
while True:
    game.handle_input()
    game.update()
    game.draw()
    sleep(500)
The game loop is the entry point for the game (the first bit of code to be executed). It defines a series of actions that we do repeatedly in order to make the game work. In this case, we get some input from the user, update the game state accordingly and then re-draw the screen. Updating the screen twice a second feels about right, and so at the end we sleep for 500 milliseconds (half a second).
The functions called in the game loop are part of the Snake class, which is defined above the game loop.
class Snake:
    """ This class contains the functions that operate
        on our game as well as the state of the game.
        It's a handy way to link the two.
    """

    def __init__(self):
        ...

    def handle_input(self):
        ...

    def update(self):
        ...

    def draw(self):
        ...

game = Snake()
A class is a handy way of keeping some state, like the position of our snake, alongside the functions that operate on it. Our class has a few different functions that we'll have to write.
-
__init__(self): This is a special Python function that is called when an "instance" of a class is created. We'll see an example of creating an instance later on. The function will initialise our variables ready for the game to run. For example, we need an initial position for the snake and a direction it will first be heading.You may notice that it takes an argument,
self. This argument is a Python requirement for functions that are part of a class, and represents the instance of the class. This means we can use it to access the state that's part of the class. -
handle_input(self): This function gets input from the user and uses it to change the direction of the snake. We'll be using the accelerometer for this which means that the user will be tilting the device to make the snake move. Again, this function takesselfsince Python requires it to. update(self): Once we have the direction that the user wants the snake to move, we can update the game state. This means moving the snake, "eating" food and ending the game.draw(self): Thedrawfunction allows us to see the game state on the screen. In this function we'll be lighting up LEDs to represent the snake and the food.
Below the Snake class definition, we create an instance of it and assign it to the variable game. If you're not yet comfortable with classes and instances, take a look at the expandable panel below.
Classes and instances
A class is a way of linking functions to variables, but you can also think of it as defining the 'type' of something. Let's use cars as an analogy:
class Car:
    def __init__(self, make, model, colour):
        self.make = make
        self.model = model
        self.colour = colour

    def print_info(self):
        print(f"This is a {self.colour} {self.make} {self.model}")

astra = Car("Vauxhall", "Astra", "white")
golf = Car("Volkswagen", "Golf", "blue")

astra.print_info()
# Prints "This is a white Vauxhall Astra"
golf.print_info()
# Prints "This is a blue Volkswagen Golf"
Now that we have a template, our first step will be to initialise the game state.
Creating the game state#
Before we can intialise the game state, we need to learn a little bit about Python and the micro:bit. Feel free to skip these sections if you have done this before.
Python lists#
Lists are a way to store multiple values in the same variable in Python. If you haven't come across them before there's a more detailed introduction here. You may be able to get by with the cheat sheet below though.
# define a list
>>> my_list = [1, 2, 3]
# access elements of a list (start counting at 0)
>>> my_list[0]
1
# -1 is the last element of the list
>>> my_list[-1]
3
# Add an item to a list
>>> my_list.append(4)
>>> my_list
[1, 2, 3, 4]
# Remove an item from a list
>>> my_list.pop(0)
1
>>> my_list
[2, 3, 4]
# list of lists
>>> list_of_coords = [[1, 2], [1, 3]]
>>> list_of_coords[0]
[1, 2]
>>> list_of_coords[0][1]
2
The micro:bit co-ordinate system#
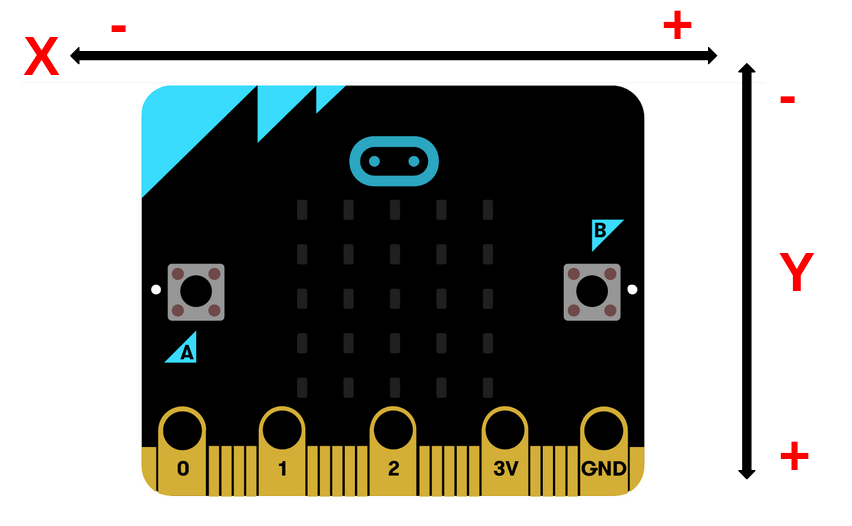
On the front of a micro:bit is a grid of LEDs. When drawing something on the screen, we need a way to describe individual LEDs within this grid so that we know which one to light up. This is where the co-ordinate system comes in.

Display co-ordinates on the micro:bit work a little like the graphs you may have plotted in school. There's an X axis that goes from left to right and a Y axis that goes from top to bottom. The main difference from the graphs in school is that the Y axis increases going down (towards the pins) whereas in school it would have increased going up.
In the image above, point A is at the co-ordinates [3, 0]. The left number in these co-ordinates is the position along the X axis and the right number is the position along the Y axis. Similarly, point B is at co-ordinates [1, 2].
Your turn 1: Filling in the state#
If you now feel comfortable with these concepts, you'll notice that the __init__ function has some commented out code. When you uncomment that, it looks like the below. Feel free to have a go at completing it and we'll look at the solution in the next section.
# direction is a string with up, down, left or right
self.direction =
# snake is a list of the pixels that the snake is at
self.snake = [[2, 2]]
# food is the co-ords of the current food
self.food =
# whether or not to end the game (boolean)
self.end =
Solution
Let's talk through the solution line by line.
self.direction = "up"
self.food = [0, 2]
self.end = False
Drawing to the screen#
We have some initial state, but if you ran this code right now, you wouldn't see much happening. That's because we're not actually drawing anything to the screen.
So what do we need to draw on the screen? Thinking back to our Google Snake example, the snake, food and grid were visible. On the micro:bit the grid is already built for us since the LEDs form a grid naturally. That leaves the snake and the food to be drawn.
Drawing the food#
Ideally, then, we need a function to light up an individual LED using its co-ordinates. The snake and the food are both stored using co-ordinates, so if we can draw these on one at a time then we'll have completed our draw function.
The micro:bit offers us a number of different ways to draw to the screen, including one that does what we need. display.set_pixel(x, y, value) will set the pixel at [x, y] to the level of brightness value. value can be between 0 and 9, where 0 is off and 9 is fully on.
Now that we have a function to turn on a pixel, we can start to fill in our draw function.
def draw(self):
    display.clear()
    display.set_pixel(self.food[0], self.food[1], 5)
    # TODO: draw snake
The first thing we do in this function is display.clear(). This sets all the LEDs off, which is important because this draw function will be called repeatedly and we want to draw something different each time. If we didn't clear the display, then the game state from the last iteration of the game loop would still be there.
Next we use the self.food co-ordinates to draw the food. We use the intensity 5 because that will help us to distinguish it from the snake.
Before we draw the snake, let's take a look at for loops in Python. Again, if you've done this before, feel free to skip it.
Python for loops#
for loops are great for when you want to do the same thing to multiple elements. In Python they're written like this:
for variable_name in iterable_thing:
    do_things(variable_name)
iterable_thing is something with multiple elements, for example a list, tuple or even a range(start, stop). variable_name is the name that you assign to the element that you are currently working on in the loop. To make this example more concrete, here's how you would print the numbers from one to five.
>>> for i in range(1, 6):
>>>     print(i)
1
2
3
4
5
# alternatively
>>> nums = [1, 2, 3, 4, 5]
>>> for num in nums:
>>>     print(num)
1
2
3
4
5
Your turn 2: Drawing the snake#
Now you know how to light up individual pixels, and how to use a for loop to go over a list, you should be able to draw the snake to the screen. You'll want to draw the snake with intensity 9 so that it looks different from the food we drew earlier. As before, the solution is below.
Solution
def draw(self):
    display.clear()
    display.set_pixel(self.food[0], self.food[1], 5)
    for part in self.snake:
      display.set_pixel(part[0], part[1], 9)
Running our code#
At this point, we should see some output, so let's go ahead and run our code. Whether or not you have a physical micro:bit, press Ctrl+Enter in the editor to bring up the micro:bit pop up. You can also click the cross in the corner and then click the green play button.
If you want to run the code on your physical micro:bit, click the "Download HEX" button in the top left corner. You can refer to the Setting up environment section if you can't find it.
You should see something that looks like the below. If so, well done! If not, go back and check the solutions match your code exactly. Whitespace matters in Python as well, so check that carefully.

Our snake is in the centre of the screen as a bright dot, and our food is at the left of the screen as a less bright dot. Yours might be in different positions depending on what you chose in Creating the game state. The next step is to make the snake move.
Moving the snake#
To understand how to move the snake, let's take a look at an example.
The animation shows a snake before and after moving down one cell. At first glance, moving the snake in this situation looks like it would be complicated, especially since it moves around a corner. Luckily for us though, it only consists of two actions.
- Calculate the new head
- Cut the tail off
So our first step will be to calculate the new head. We can do that with the help of if statements.
Python if statements#
Sometimes we want to choose what to do based on a condition. For example, you would want to wear a coat if it was raining outside, but if it was sunny you would put on sunglasses. You can do this in Python using if statements.
# rain is a boolean variable (True or False)
if rain:
    put_on_coat()
else:
    # it must be sunny
    put_on_sunglasses()
# we'll go outside whether it's raining or sunny
go_outside()
You can even choose between more than two options. Sticking with the weather example, maybe it could be windy, rainy, or sunny. Being the responsible person that you are, you have clothes for each different possibility.
# in this case, weather is a string
if weather == "rain":
    put_on_raincoat()
elif weather == "wind":
    put_on_jumper()
elif weather == "sunny":
    put_on_sunglasses()
go_outside()
Your turn 3: Calculating the new head#
We're going to be working in the update() function here, since that updates the game state before we draw the screen.
There are a few steps in calculating the new head of the snake.
- Get current head of the snake (last item of the list)
- Calculate a new head based on
self.direction. - Add this head to the end of the list (
.append(item)function)
The most difficult step here will be figuring out what to do for each direction. You might find this easier if you draw it out on a co-ordinate grid like the one in the micro:bit co-ordinate system section.
Important - If you create the new head from the old head (e.g. new_head = self.snake[-1]), you will need to copy it. Otherwise you will have a really annoying bug. You can copy a list like so:
# call list() to copy the old head
new_head = list(self.snake[-1])
What is the really annoying bug? (optional)
If you don't copy the head of the snake, then you will modify the existing head as well as creating a new one. Let's illustrate this with an example: Let's imagine a snake at `[[1, 1], [2, 1], [2, 2]]` where `[2, 2]` is the head of the snake. Also let's say that the snake is moving south. ![Snake at `[[1, 1], [2, 1], [2, 2]]`](/images/microbitsnake/bugex1.png) When we update the snake, we will take the head and update it to `[2, 3]` since it is heading downwards. Ordinarily this would mean the snake looks like this: ![Snake at `[[2, 1], [2, 2], [2, 3]]`](/images/microbitsnake/bugex2.png) However, since we didn't copy the head, we'll end up modifying the existing one **and** appending it, so our snake will be at `[[2, 1], [2, 3], [2, 3]]`: ![Snake at `[[2, 1], [2, 3], [2, 3]]`](/images/microbitsnake/bugex3.png) This is because lists in Python are _mutable_, which means that you can modify their values. When we type `new_head = self.snake[-1]` we're not creating a new list called `new_head`, we're assigning a new name to `self.snake[-1]`. Some objects in Python, for example tuples, are _immutable_ which means their values cannot be changed. If we used tuples for the co-ordinates we would not have this problem. However, if we used tuples, the code wouldn't be as simple as incrementing or decrementing a co-ordinate, and it would introduce another concept to a beginner-friendly tutorial, something I'd like to keep to a minimum.
Solution
def update(self):
    new_head = list(self.snake[-1])
    if self.direction == "up":
        # Y decreases as you go up the screen
        new_head[1] -= 1
    elif self.direction == "down":
        new_head[1] += 1
    elif self.direction == "left":
        # X decreases as you go left
        new_head[0] -= 1
    elif self.direction == "right":
        new_head[0] +=1
    # put the head on the end of the list
    self.snake.append(new_head)
Your turn 4: Removing the tail#
Remember the .pop(idx) method on lists from before? You can remove an item from a list by calling this function with the index of the item that you want to remove.
>>> my_list = [1, 2, 3]
>>> my_list.pop(0)
1
>>> my_list
[2, 3]
Your task is to remove the tail of the snake. Here's a hint, if we add the new head to the end of the snake list, then the tail will be at the start of it.
Solution
The full `update` function should now look like this:
def update(self):
    new_head = list(self.snake[-1])
    if self.direction == "up":
        new_head[1] -= 1
    elif self.direction == "down":
        new_head[1] += 1
    elif self.direction == "left":
        new_head[0] -= 1
    elif self.direction == "right":
        new_head[0] +=1
    self.snake.append(new_head)
    # cut the tail of the snake
    self.snake.pop(0)
We're now ready to run this again, and our snake should now move!
Except, we get an error. The error on the simulator isn't very helpful, but on the micro:bit it makes more sense.
ValueError: index out of bounds
What's happening here is that our new_head is going out of bounds, which means it's becoming a value that can't be displayed on the screen. If you remember our co-ordinates diagram, the Y co-ordinate is getting smaller until it gets to -1. When we then try and call display.set_pixel with -1 as an input, it gives us an error, since there's no LED at [2, -1].
We could fix this by ending the game if the snake goes out of bounds, but on a screen this small that wouldn't be much fun. Instead, let's fix it by wrapping our snake around the board.
Wrapping#
Wrapping just means that if the snake hits one side of the screen, then it should appear on the other side of the screen.
In the above example, the snake is moving up the screen. After the snake's head reaches [3, 0] it goes to [3, 4] and appears at the bottom of the screen. The snake continues to move upwards, just starting from the bottom of the screen now. We can implement this behaviour by checking the bounds of the new_head.
Your turn 5: Wrap the screen#
The bounds of our screen are 0-4 in both the X and Y axes. So you'll want to check if the X co-ordinate or the Y co-ordinate are less than/greater than these boundaries. If they are, reset them to the other edge of the screen.
Again, for this task we'll be working in our update method.
Solution
def update(self):
    ... # the code from above
    elif self.direction == "right":
        new_head[0] +=1

    # X co-ordinate
    if new_head[0] > 4:
        new_head[0] = 0
    elif new_head[0] < 0:
        new_head[0] = 4
    # Y co-ordinate
    if new_head[1] > 4:
        new_head[1] = 0
    elif new_head[1] < 0:
        new_head[1] = 4

    self.snake.append(new_head)
    ...
When we add this code to our game, it should look like the below.
Getting input#
At this point, we have an image on the screen and the snake moves! The user can't yet control the snake though, so let's add that in.
The micro:bit has a few different ways of getting input from the user and the world around it. Most visibly, it has two buttons on the front that the user can press. While we could use these for input, four directions doesn't map into two buttons in an intuitive way. Other inputs the micro:bit has include an accelerometer for detecting tilt and motion, a compass for direction relative to the earth, pins on the bottom for electrical input and a temperature sensor. Out of these, the accelerometer can provide the simplest method of control.
Accelerometers#
We won't try to understand how accelerometers work here, that would take a post of its own. However, we can understand what an accelerometer can do for us. If you've never heard of an accelerometer before, it's the bit of your phone that detects orientation and makes your videos landscape when you tilt your phone.
In short, an accelerometer can measure the tilt of a device, and we can use this for our game. To see how this will work, take a look at the video below.
The dot follows the tilt of the device here. When we tilt the device away from us, the dot heads up the screen (away from us). Tilting the device to the left, right or towards us have similar efects.
Simulator only: How to test with the accelerometer#
The micro:bit pop-up in the simulator has some tabs along the top for controlling the various components of the micro:bit. One of these tabs controls the accelerometer (seen in the video above). In the tab you will see three sliders, one for each axis, and a checkbox labelled "Move accelerometer with mouse". Go ahead and tick that checkbox.
With the checkbox ticked, you'll notice that moving your mouse over the micro:bit's screen will change the accelerometer values in the sliders. As you head towards the lower-right corner of the micro:bit the values will increase, and as you head towards the upper-left corner they will decrease.
Your turn 6: Updating direction#
We're working in the handle_input function for this section.
The accelerometer will return you values in the X and Y axes using the following functions. We don't care about the Z axis since our screen is 2D.
# These functions return values in the range -2000 to 2000
accelerometer.get_x()
accelerometer.get_y()
The X axis increases going left to right, and the Y axis increases from top to bottom, just like the screen co-ordinates.
We'll calculate the direction the user wants to go in by taking the biggest value from X and Y and then seeing if it's positive or negative (see diagram above). Careful though! X and Y can both be negative, so you can't do a simple X > Y. To see why, imagine that X was 500 and Y was -1000. Even though Y is a bigger number than X, X > Y == True because X is positive.
You may find the absolute function, abs(x), useful.
# abs (the absolute function) will remove a minus sign if present
>>> abs(-30) == 30
True
# ... and leave the value alone if not
>>> abs(30) == 30
True
Solution
def handle_input(self):
    # get accelerometer values
    x = accelerometer.get_x()
    y = accelerometer.get_y()
    # compare the magnitude of X and Y
    if abs(x) > abs(y):
        # X is bigger than Y (maybe negative)
        if x < 0:
            self.direction = "left"
        else:
            self.direction = "right"
    else:
        # Y is bigger than X (maybe negative)
        if y < 0:
            self.direction = "up"
        else:
            self.direction = "down"
The user can now tilt the micro:bit to make the snake move! You may notice while playing with this that the snake will never grow, so now it's time to figure out how food works.
Food#
When the snake approaches some food, we want the snake to grow and the food to appear again in another location. Ideally, the process would look like the following animation.
Building our food mechanic can be split into two steps. Detecting and reacting to food being eaten, and then generating new food.
Your turn 7: Eating food#
The snake "eats" the food when its head is in the same cell as the food. When it eats the food, it should grow by one cell which can be done by not cutting the tail from the snake.
In the case that the snake is eating the food, you should leave some space in your code to generate the new food.
Hint: In Python you can compare two lists just with list1 == list2.
Solution
def update(self):
    ...
    self.snake.append(new_head)
    if new_head == self.food:
        # generate new food
        pass
    else:
        # cut the tail of the snake
        self.snake.pop(0)
Random numbers#
We want to generate new food randomly so that the game is interesting. We can do this using the random module in Python. Here's an example that guesses (poorly) how old you are.
# import the function randint from the module random
from random import randint

# generate a random integer between 0 and 100 (inclusive)
age = randint(0, 100)

print(f"I bet you are {age} years old")
In this program we import then call the randint(start, stop) function. This will give us back a number between 1 and 100. We then print it out using an f-string. Side note: if you haven't come across f-strings before, check out that link. They are very cool.
We'll be using this randint function to generate random co-ordinates.
Your turn 8: Generating food#
To generate new food, you'll need to generate an X co-ordinate and a Y co-ordinate. Remember, the axes run from 0 to 4.
One edge case you'll have to think about is what happens if the co-ordinates you generate are covered by the snake. The solution I'll recommend is to keep re-generating the co-ordinates until they are not in the snake, but feel free to come up with your own solutions here. You can check if the co-ordinates are inside the snake using the in keyword (co_ords in self.snake) and a while loop.
Solution
def update(self):
    ...
    if new_head == self.food:
        self.food = [randint(0, 4), randint(0, 4)]
        while self.food in self.snake:
            self.food = [randint(0, 4), randint(0, 4)]
    ...
Is this really a valid solution?
In case you're having trouble believing that re-generating the food is a valid solution, let's take a look at some probabilities. We can model generating the food successfully as a binomially distributed random variable. If the snake is of length two (the smallest case after eating food), then the probability of generating the food in an empty space is 23/25. This means that we have a 92% chance of success on the first go and a 99% chance of succeeding within two tries. The expected number of generations before our first success is just over 1. Taking the worst case where the snake is length 24 after eating food, the probability of generating the food correctly is 1/25. This means that the expected number of trials before our first success is 25. In fact 63% of the time it will take 25 tries or fewer and 99% of the time it will take fewer than 113. These numbers are very small for a computer, and we won't notice much delay in the snake's motion.
Our snake game is almost finished! The only step left is figuring out how to end the game.
Ending the game#
The game of snake ends in two situations. Firstly, if you crash into yourself (or the wall, in some versions) then you lose. Secondly, if you fill the entire grid with your snake then you win.
We'll worry about losing the game for now, and I'll leave winning the game as an exercise for you.
Loop control#
We've seen while loops a couple of times so far. Most recently we used them to generate food, but at the very start we saw how our game loop is made of a while loop.
In Python, you have the ability to run a loop forever with while True. The complementary feature is that you have the ability to cut a loop short early using the break statement. Let's take a quick look at how it works.
In the below example, we wait for the micro:bit's button A to be pressed then show a happy face.
# import all the microbit code
from microbit import *

while True:
    # check if button A was pressed since we last called this function
    if button_a.was_pressed():
        # if so, exit the loop
        break
    # wait for 100 milliseconds
    sleep(100)

# show a happy face
display.show(Image.HAPPY)
Your turn 9: Ending the game#
There are three steps to implementing losing the game.
- Detect if you've crashed into yourself using the
inkeyword. This will be part of theupdatefunction. - Set
self.endtoTrueif the player has lost. - Use
breakin the game loop if the player has lost.self.endwill begame.endinside the game loop.
You could also display a sad face, or scroll some text if the player loses. Get creative!
Solution
In our update function:
def update(self):
    ...
    # after we calculate new_head
    if new_head in self.snake:
        self.end = True
    self.snake.append(new_head)
    ...
while True:
    ...
    game.update()
    # now game.end will be set
    if game.end:
        display.show(Image.SAD)
        break
    game.draw()
    ...
Final notes#
Well done on making it this far! You've just built your very own game, and can be really proud of yourself. I hope you've enjoyed the experience and that it's inspired you to keep going with micro:bit, programming or game development. If you want some more material for learning, then check out the Useful links below. If you'd like to check your solution, I've put the final code for this tutorial on GitHub.
This tutorial was based off a workshop that I wrote while part of the Embedded and Robotics Society (EaRS) at Edinburgh. It was one of my favourite workshops there, and it's been fun to re-visit it and turn it into a full tutorial. If you like this, then they have more resources on their website so you should check them out.
If you found any issues in this tutorial, have ideas for new tutorials you'd like to see, or have a question then feel free to contact me. I'd love to hear from you.
Extensions#
Just because you finished this tutorial doesn't mean you have to stop working on the game. There are a number of extensions you could make to it, and you may even think of some of your own.
- Implement a winning condition.
- Stop the player from going in a direction opposite to the current one they're going in. This annoyed me while playing the game, since it means you lost when you go back into yourself, and most snake implementations prevent you from being able to do this.
- Expand the game grid. Maybe you could have a grid that is bigger than the screen, and display a part of it at a time. You could show this by moving the food instead of the snake, or by flashing the screen when you drew a different area.
Useful links#
- Official Python editor for micro:bit
- MakeCode for micro:bit (JavaScript/Scratch)
- Embedded and Robotics Society Edinburgh
- Original workshop slides
- UCL BBC micro:bit tutorial
Copyright#
Pretty micro:bit SVG images were modified from the Micro:bit Educational Foundation's GitHub repo under the CC BY-NC-SA 4.0 license. Those images on this page are therefore licensed under the same terms.
All other content on this page is licensed under the CC BY 4.0 license.
The create.withcode editor hosted on my site is courtesy of Pete Dring of blog.withcode.uk. It has been slightly modified, hence this tutorial not using the official site.